Hello all! I have a fun layout to share with you today! It uses my Cameo and one of my favorite brands ever...Webster's Pages. Webster's Pages had a challenge up on their blog to get trendy and use die cuts on your layout. They are right, cutting with your Cameo (or similar machine) is very in right now.
I personally love all the cool things you can do with your Cameo. Although, I will admit, I haven't used it as much as I want to because I get frustrated. I feel like I must be doing it all wrong because most the time I can't get it to work right. I can get it to cut my kraft cardstock perfectly. Yeah! But if I want to cut patterned paper, it either doesn't cut through the whole paper and I have to use my craft knife to cut out the rest, or it rips up the paper. Seriously thought I wasn't going to try anymore when I finally got it to work with my kraft cardstock. But I do wish I could get this thing figured out. :(
Anyways...
Here's the layout I did for the WP challenge:
I used pieces from a variety of collections for this layout.
This summer my sister-in-law took pictures of me and the kids. There was four photos. But just my luck, none of them worked great...each one had at least one person with eyes closed or face turned. You know how great Photoshop experts can take one person from one photo and put it in another photo and have it match seamlessly so you have the perfect picture. Well I spent several hours trying to do that. And failed miserably. So finally I gave up and thought I would do a better job just me and my craft knife. So I cut each person out of the best photo they had and then layered them all together on the photo to create the best possible photo for me. :) It was actually kind of a cool trick...who needs Photoshop. ;)
Here are the close up's of my layout and you can see the photo better too:
Well thanks so much for popping in today!
Have a fantastic day!
Showing posts with label Fun Techniques. Show all posts
Monday, September 24, 2012
Thursday, July 26, 2012
This Hobby Is Meant To Be Fun!
Every now and then, you just gotta have fun...play...try a new technique. That's what I did with the layout I am sharing today.
I tore my scrap papers and glued them on my page in four columns. Then I added a bit of white paint over them. This kinda dulled it, and when I went to add elements to make page later, it just made them pop even more. :)
I did this layout for The ScrapCake's blog. Flo and I both created layouts based on this sketch, created by myself:
To check out Flo's AWESOME layout, go here.
And here are close up's of my own layout:
I used the beautiful My Private Happiness collection from The ScrapCake for most of my layout, but there are bits and pieces from Summer At The Seaside thrown in there too.
Sooo...we'd love to see what you do with this sketch! Leave a link here so I can check it out OR use papers from The ScrapCake and leave a link on this post here. :)
Thanks so much for stopping in!!!!
Have a wonderful day!
I tore my scrap papers and glued them on my page in four columns. Then I added a bit of white paint over them. This kinda dulled it, and when I went to add elements to make page later, it just made them pop even more. :)
I did this layout for The ScrapCake's blog. Flo and I both created layouts based on this sketch, created by myself:
To check out Flo's AWESOME layout, go here.
And here are close up's of my own layout:
I used the beautiful My Private Happiness collection from The ScrapCake for most of my layout, but there are bits and pieces from Summer At The Seaside thrown in there too.
Sooo...we'd love to see what you do with this sketch! Leave a link here so I can check it out OR use papers from The ScrapCake and leave a link on this post here. :)
Thanks so much for stopping in!!!!
Have a wonderful day!
Thursday, July 5, 2012
Leftovers
Hi everyone! Hope you had a nice day yesterday.
Today I am sharing a layout that I made using the PB&J collection from BasicGrey.
I used lots of leftover strips on my layout.
Here are some close up's:
Today I am sharing a layout that I made using the PB&J collection from BasicGrey.
I used lots of leftover strips on my layout.
Here are some close up's:
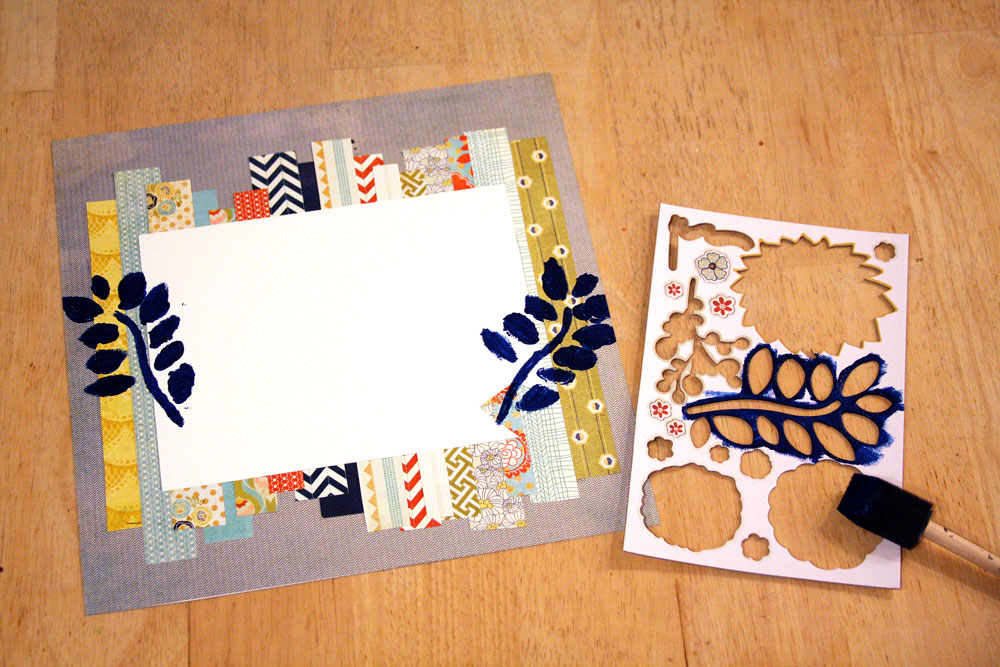
And thought I'd share a quick tip with you. :)
You can save leftover chipboard negatives and use them as a stencil. I dabbed blue paint through the spots left (although I did get a little sloppy with mine).
Just another idea...another way to use your leftovers.
Well thank you so much for stopping in today!
I hope you have a FANTASTIC day!!!
Monday, July 2, 2012
Making Laundry Easier (and Prettier)
Hi everyone! I've got a fun project to share with you today that has a purpose. We are trying to get the kids more involved in the chores around the house. Previously they had been just piling all the laundry on the floor in the laundry room and leaving me to deal with it. Well I have told them now that they need to sort it out. I made some signs using the Half Bracket Chipboard Banners from Fancy Pants Designs to hang on the baskets so the kids know what goes where.
Here's how I did it:
1. First I covered my chipboard banners with some of my favorite pieces of paper, and cut them out.
2. I painted on some gesso in the center of my banner pieces, and added some splatters as well. You can use white paint instead of gesso.
3. I glued some burlap to the back of my pieces.
4. I took the letter stickers and added the labels (colors, whites, delicates, towels) that we use to each piece.
5. I then added a crackle texture technique from Helmar. It is painted over the whole piece including the letters. It helps keep everything securely on (so no missing letters later) but it's also just a cool look! I added a bit of pink ink to the cracks.
6. Then I decorated each banner piece using strips of papers, flowers, stitching and ribbon.
And here's a tip for you. These banners came with a bit of ribbon but it didn't have enough for this particular project. I looked for ribbon that I had that was similar in color, but I didn't have any. But I did have some fabric (it was actually canvas fabric), so I just cut a strip and used it as ribbon. You can do this with any fabric. :)
Of course, you can make this a quicker, simpler project by skipping some of my steps, but anybody can do this fun project! I am thinking of doing more projects for my laundry now with the collection to match these. :)
Thanks for stopping by the blog today!! Have a wonderful day!
Thursday, March 29, 2012
Sharing a Fun Tip
Hi everyone! Thanks for stopping by the blog today! I wanted to share a quick tip with you. I LOVE to use my scraps, but I especially love using my leftovers from punches! They add such great design to cards and projects and it's a really easy addition since you already have it punched. For example, here's a card I made using the gorgeous Beautiful Botanicals stamp set from Skipping Stones Design.
I started by stamping a row of flowers:
(Holy cow there's a lot of ink on that stamp...just ignore that!)
Then I laid over my flowers a piece of paper that I had punched circles out of.
As you can see, I added lace underneath that. But I love how the flowers are just peeking through the holes. I actually stamped a few more light flowers in spots that looked a little bare.
Then I added just a little more and my card was done!
Hope I have inspired you to use those punched scraps! I really think it adds a unique fun design element to any project.
Have a wonderful day!
I started by stamping a row of flowers:
(Holy cow there's a lot of ink on that stamp...just ignore that!)
Then I laid over my flowers a piece of paper that I had punched circles out of.
As you can see, I added lace underneath that. But I love how the flowers are just peeking through the holes. I actually stamped a few more light flowers in spots that looked a little bare.
Then I added just a little more and my card was done!
Hope I have inspired you to use those punched scraps! I really think it adds a unique fun design element to any project.
Have a wonderful day!
Wednesday, March 28, 2012
Construction of a Mini
Hi everyone! Thanks for the advice on yesterday's post! I know we've all been there. I imagine that can be said for any hobby.
Today I wanted to share a small mini with you that I made.
Construction:
I love it when companies make those 12x12 papers with 4 6x6 designs on them! I think they are perfect for mini albums. We R Memory Keepers does that. My album today uses their Down The Boardwalk collection.
First I started with one of those papers to make my inside pages. I knew I wanted them to be smaller than the 6x6 and I really wanted to make them shaped. I used the perfect beach day die cut as inspiration and template for my inside pages.
I took the die cut and place it over each design and drew my template for my pages. I wanted to keep the inside uncut as it would be the middle of my mini, where the fold was.
Typically I would draw with a pencil and then erase, but since I was doing this for a tutorial I used the black sharpie to make it more visible. However, I highly suggest you use pencil. :)
So my paper ended up looking like this:
Next I took another one of those fun papers with 4 different designs to make my cover. I started by cutting it and using 2 designs for the cover and back, keeping them 6x6. (But I later cut them down some).
So here's my mini:
Completed Album
After this point, it didn't take long to add my photos, journaling and embellishments. Here's my completed album:
That lace serves two purposes. It adds to the design of the album and it keeps the album shut. So you just untie it to open the album.
Today I wanted to share a small mini with you that I made.
Construction:
I love it when companies make those 12x12 papers with 4 6x6 designs on them! I think they are perfect for mini albums. We R Memory Keepers does that. My album today uses their Down The Boardwalk collection.
First I started with one of those papers to make my inside pages. I knew I wanted them to be smaller than the 6x6 and I really wanted to make them shaped. I used the perfect beach day die cut as inspiration and template for my inside pages.
I took the die cut and place it over each design and drew my template for my pages. I wanted to keep the inside uncut as it would be the middle of my mini, where the fold was.
Typically I would draw with a pencil and then erase, but since I was doing this for a tutorial I used the black sharpie to make it more visible. However, I highly suggest you use pencil. :)
So my paper ended up looking like this:
Then I cut it out.
Then I just ran it all through my sewing machine to create my book.
I also knew I wanted to use that fantastic die cut in my mini too, so I adhered it down as the center of the album. :)
Completed Album
After this point, it didn't take long to add my photos, journaling and embellishments. Here's my completed album:
That lace serves two purposes. It adds to the design of the album and it keeps the album shut. So you just untie it to open the album.
What do you think? It's actually a very simple mini album. Surprisingly, I didn't have too many pictures from my cruise, so I used what I had. It was one of the most relaxing things I have ever done! I can't wait to go on my next cruise. :)
Thanks for stopping in today! I hope you have a terrific day!!!
Friday, December 9, 2011
Spellbinders Series: Stenciling
Hi everyone! Thanks for stopping in today, for my fourth post in my Spellbinders series. If you missed the others, you can find them here, here and here. So...on the packaging on Spellbinders dies it reads "Cut, Emboss, Stencil." Today I am trying my hand at stenciling (and of course I did add some elements that were cut too). I have a very limited amount of dies, so I apologize that all my projects are using the same dies. My layout today uses the Wonderful Wings dies and the Grand Labels One dies.
But first let's start with the technique.
For my background, I decided to use my butterflies and some ink to create my own fun background. I simply laid the butterfly die on my paper and sponged ink around it, like so:

And repeated this several times with different colors, to create this:
Next I softened it a little by spraying my paper with water. It's kinda hard to see it in my pictures, but it did blend it better and give it more of a watercolor look.
Another thing I love to do with stencils is to use them for my stitching (have you noticed that I like to stitch?) So I first cut using my large label, and then I used the next size down as a stencil. I simply took a pencil and drew around the inside of the die.
I left it like that until I completed my layout, then my final touch was to go back and add stitching to where the pencil lines were visible. This way I didn't take time to stitch where it was going to be covered up.
So you want to see my completed layout using both of these techniques?
Here it is:
I thought it would be cool to add my journaling on the butterflies. :) The products I used are a mix, so I will add my supplies at the bottom of the post. One thing I did want to mention was that I was out of y's for my title, so I used upside down h's instead. You probably wouldn't have even known if I hadn't mentioned it. :)
Here are some close up's of my layout:
So it looks like I may be having surgery on my knee. :( I see my doctor again today and meet with a surgeon next to discuss it all, but my doctor recommends the surgery for my case (he says he doesn't for all). Any thoughts? A few of you have already commented on facebook...just wondering if anyone has any strong opinions on knee surgery?
Again, thanks for stopping in! Have a FANTASTIC day! :)

Supplies for "My Oh My" layout:
Papers--Pink Paislee, My Mind's Eye, Crate Paper. Dies and Die Cutting Machine--Spellbinders. Cardstock--American Crafts. Ink--Stampin' Up!. Butterfly Brads: Creative Charms, Chipboard Letters--My Little Shoebox, Lace--Hobby Lobby Stores, Floss--DMC, Pen--Sharpie.
Subscribe to:
Posts (Atom)